
W3 Total Cache is one of the plugins I add to every single one of my WordPress installations. The purpose of the plugin is very simple…
W3 Total Cache improves the speed of your WordPress website.
And folks…speed is very important.
Your visitors love speed. The faster they can click through to different pages on your site, the happier they are.
Mobile device users really love speed. Web surfers who are hitting your site via smartphones and tablets will really appreciate the convenience of fast loading pages.
And let’s not leave out the folks who live in rural or remote areas… They also really like it when your site loads quickly.
And you know who else loves site speed?
These guys…
![]()
It’s a known fact that Google uses page speed in their ranking algorithm.
How does page speed improve search engine rankings?
Site speed is part of the happiness equation. When a site loads quickly it makes your visitors happier and that’s what Google wants…internet searchers who are happy site visitors. When a visitor hits your site and experiences long load times, they are probably going to spend less time exploring your content. In extreme cases, they may even bounce before the page finishes loading.
Google does not like this.
However…if your site loads like greased lightning, as is the case with most everything that I build, then you’ll be on Google’s good side. When your visitors are clicking through to pages all over your site, enjoying a frustration-free experience, then they’re happy…and so is The BIG G.
How W3 Total Cache improves the speed of your WordPress website
I’ll spare you most of the nerdy details here, because, well…what you really want is a faster site; you don’t necessarily care to know what all of the settings do, right?
WordPress is a data-driven resource hog. When a visitor comes to your site and accesses a page, WordPress has to run a database query to serve up that page. For low-traffic sites this is not a huge problem, but when you consider that at some point you may wind up having dozens and maybe even hundreds of requests each minute, this can put a lot of strain on your available resources.
When W3 Total Cache is enabled, instead of running database queries every single time a visitor hits a page on your site, the plugin creates a cached static html after the first visitor loads a page, then serves that file to all subsequent visitors. Until the page is changed – either through an edit in the admin area or a comment left on the front end – the plugin continues to serve that same cached file. This drastic reduction in the amount of database queries greatly reduces CPU usage and thus results in a noticeable boost to page speed – especially during times of heavy load – which would be in the case of a traffic spike or during peak hours on a shared server.
For those of you that don’t know the term ‘shared server hosting’… Shared hosting is the basic level of web hosting that the majority of website owners use. Shared hosting is where loads of websites are hosted on one powerful box – sharing all of the resources. Some shared hosting providers offer excellent servers which aren’t overcrowded, but then there are some which overload their servers to the max in order to achieve maximum profit. Depending upon your server setup and your website neighbors’ behavior, W3TC can offer a tremendous improvement in this type of hosting environment.
During peak traffic times or in the event of a load spike, W3TC can mean the difference between downtime or no downtime. It’s no guarantee, but W3TC may even prevent 500 errors if you’re being talked about on Digg or Reddit.
How to set up W3 Total Cache (quick and dirty noob friendly version)
For this tutorial I’m going to use a site owned by one of my comrades at Wealthy Affiliate. He’s been allowing me to help with his site, so no doubt he’ll be pleased that I’m taking this opportunity to use him as a test subject, considering the performance boost he’s going to see afterward.
If you’re going to follow along and set this plugin up for your website, first run some tests beforehand so you can measure the improvement you get from using W3TC. Go to: Google PageSpeed Insights and Pingdom. Take screenshots of your results or write them down for comparison afterward.
Step 1. Go to your Plugins menu and click ‘Add New’

Step 2. On the plugins screen, type W3 Total Cache into the search field. Hit ‘Enter’.

Step 3. Click on ‘Install Now’

Step 4. Click ‘OK’

Step 5. Click ‘Activate Plugin’

Step 6. Go to: Performance > General Settings

Step 7. Leave all default settings, but check the following boxes:
Page Cache

Database Cache

Object Cache

Step 8. Click on any one of the ‘Save All Settings’ buttons

Step 8. Click on Performance > Browser Cache

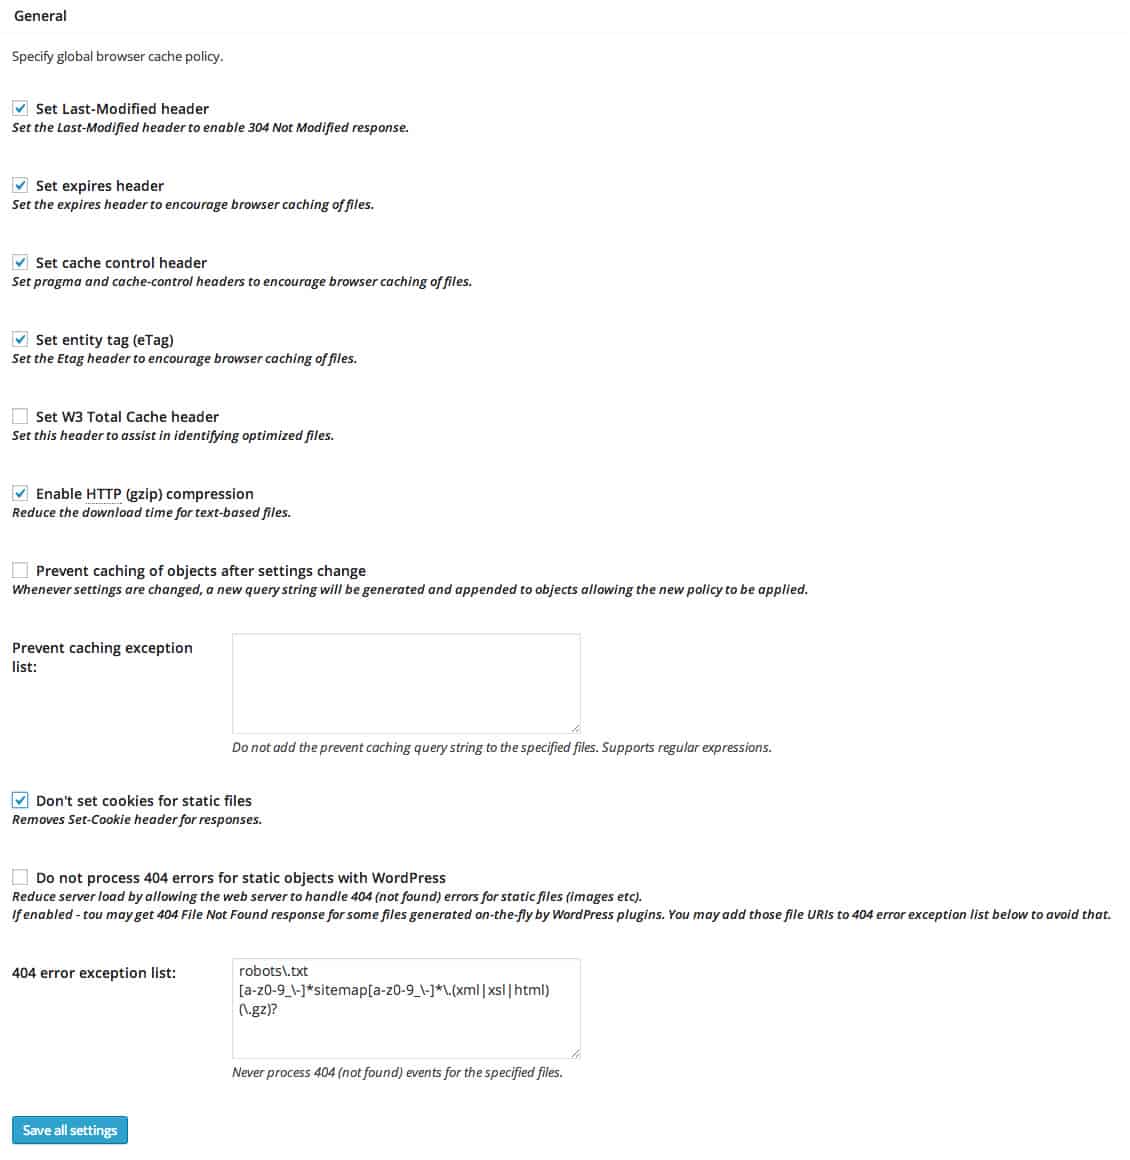
Step 9. In the Browser Cache > General Settings area make sure the following boxes are checked:
- Set Last-Modified Header
- Set expires header
- Set cache control header
- Set entity tag (eTag)
- Enable HTTP (gzip) compression
- Don’t set cookies for static files
Here’s a screenshot of the settings for visual reference…
Step 10. Click ‘Save all settings’ again

Step 11. At the top of the page you’ll see a button that says ‘Empty the page cache’. Click it.

Step 12. Celebrate! You’re done!
Now you can head back over to Pingdom and Google Page Speed Insights to see what W3TC has done for your page speed.
Here’s what it did for my friend who I’m helping out here…
The Google PageSpeed results were slight, but still an improvement.
Before W3TC

After W3TC

Pingdom, however, showed a huge improvement – especially with load time…
Before W3TC

After W3TC

And here’s a snapshot of what my Google PageSpeed and Pingdom results looks like for crajun.com…


Now keep in mind that the above results were obtained through sites that are both hosted with Wealthy Affiliate. Their hosting is a bit restrictive, but speed isn’t a problem. I’m still determining my long-term hosting plan with Wealthy Affiliate, but I tell you…I am quite impressed with the performance aspect of it!
I’m actually running a few more plugins than the site shown in the first example above, with probably a similar amount of content. So how is it that I managed to leave his site in the dust..? I attribute that to the lean and mean, lightning fast Genesis Framework, which happens to be the only theme I ever use. It is the best I’ve ever worked with. Period.
Don’t underestimate the value of clean, optimized code, and the performance boost a quality theme can give a site. In fact, one of the best things you can do for your WordPress website – in terms of improving its speed – is to limit the amount of plugins installed and to only use a theme that’s well supported, highly rated and popular (if you’re going for a free one; otherwise, I recommend going premium and throwing down some cash for Genesis…you won’t be sorry).
For some of you this next announcement is going to blow your minds… The results I obtained above are with Jetpack installed. Some people are down on Jetpack – including the head muckity mucks at Wealthy Affiliate – but I’m sorry…it is a solid plugin that solves a lot of problems. I run it on most of my installations, and as you can see, with W3TC installed, the additional resource usage is a non-issue.
In closing…
Keep in mind that YMMV depending upon the amount of plugins you’re running, the theme you’re using, and what sort of hosting you have. As I’d mentioned, both examples above show sites that are running on Wealthy Affiliate’s hosting platform, which isn’t exactly premium grade. But I gotta tell you…I’m damn impressed with it so far, and given that unlimited website hosting is included within the price of premium admission, it’s a freakin’ sweet deal!
Alright…well I hope I sold you on the benefits of W3TC, and I also hope that my little tutorial here has enabled you to get it up and running without any hassle!
Cheers!